In this blog, I will walk you through the process of creating a clone or capturing an image of a virtual machine (VM) in Microsoft Azure.
Why Do You Care?
A relatively typical task for an administrator is one where they replicate a VM with its current state and software in order to save time. Another benefit of this task is that the administrator knows the configuration is exactly the same as the original VM, which becomes incredibly useful when testing or ensuring security by design.
Learning how to create a clone or capture an image of a virtual machine in Azure will allow you to quickly deploy VM's from the gallery when you select images.
To create an image with both Windows and Linux, you need to prepare the virtual machine for what I call generalization. Then remove the identifiable bits of the virtual machine to Azure. There is a slightly different approach with Linux vs. Windows, but they do sort of the same thing.
Let's Get Started
In Windows, the tool to help us with generalization is called sysprep it is located in "system32/sysprep."
Click on ”Start” then ”Run” and just type ”sysprep” and the folder will pop up.
When sysprep executes, make sure the settings are ”OOBE (Out-Of-Box-Experience)” and the VM is set to “Shutdown.”
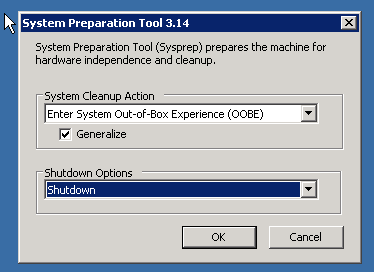
Once you click “OK”, the generalization with continue and the VM will show shutdown in the Azure Portal.
Let's stop here for an IMPORTANT note. Some applications or custom software installed on VM's can be affected by a sysprep. Please check this first. If you find out that you cannot sysprep the VM, you can still clone or replicate it. You can shutdown the VM, then delete the VM but keep the disks. In the storage account container where the VHD resides just copy it to another container.
Now head over to Virtual Machines again and click on "Images." At the top click “Create” and fill out the form to add an image of the VM you want to clone.
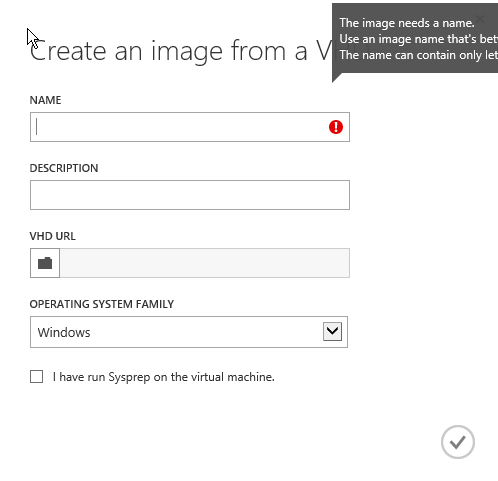
Next, select the VM now in a ”Shutdown” state and click “Capture.” This action will delete the original VM so if you want a copy use the method above to copy the Virtual Hard Disk (VHD).

Linux VM
With Linux in the SSH console run "sudo waagent –deprovision." This will remove the Azure Agent no matter what version is installed on the box.
Here is a list of what's done:
- Removes SSH host keys (if Provisioning.RegenerateSshHostKeyPair is 'y' in the configuration file)
- Clears nameserver configuration in /etc/resolv.conf
- Removes the root user's password from /etc/shadow (if Provisioning.DeleteRootPassword is 'y' in the configuration file)
- Removes cached DHCP client leases
- Resets host name to localhost.localdomain
- Deletes the last provisioned user account (obtained from /var/lib/waagent) and associated data
Now use PowerShell or Azure CLI to run "azure vm capture -t <your-virtual-machine-name> <new-image-name>" this will capture the image and add it to the image list in the Azure Portal and "azure vm image list."

Now you can see the image in the create new VM gallery as well.
Hope you found this helpful leave me a comment if you run into any issues. Also, let me know what other quick tasks you might be interested in learning about or getting a quick walk-through on – I am happy to help!