If you have kids, especially younger ones, and you are like me, you take an extreme number of pictures. As I mentioned in my first blog I have two little boys named Tucker (age 4) and Tanner (age 2). My wife and I bought a Canon EOS Rebel a few months before our first son was born and in the four years since we have really punished that camera.
At the last count, that one little camera has taken over 16,000 pictures. Now, for a professional photographer that may seem like a drop in the bucket, but for an average user, that sure seems like a lot to me. Now keep in mind, that’s just one of our cameras. We also have 2 small point-and-click style cameras that can easily be dropped in a diaper bag or my wife’s purse, not to mention our camera phones. I recently moved all the pictures off of my wife’s phone because she didn’t have any more room on it — because of her pictures. She has taken just over 1,000 pictures in the six months she has owned that phone. And since our kids were born, we have somewhere in the neighborhood of around 20,000+ pictures.
The issue for me now is what to do to ensure all of these photos are safe and never get lost. Four years ago — a long time in terms of technology — that wasn’t much of an issue as I only had maybe 1,000 pictures total. At that time, I had a system in place that used multiple redundancies by having copies backed up on multiple hard drives plus DVDs stored in a safe. Now, fast-forward four years and that has turned into a lot of DVDs. Also, if you are anything like me and my wife, and something goes wrong with a computer or gadget, you are the first to get blamed. The same goes for our pictures, as I am the magical key holder to ensuring they stay safe. This is where Azure Storage comes in.
Discovery
I know a lot of you are might be thinking, “Just use your SkyDrive. It’s free.” Which is partly true and would be nice, but the space on SkyDrive is limited. I am a veteran user so I have 25GB, if I wasn’t I would be limited to 7GB as my base amount, and could purchase up to another 100GB, but then I would be capped out. Currently, our storage needs require exactly 122GB to store all of our pictures. That doesn’t even include the hours and hours of video I have that add up to just over 200GB! I looked into several third-party companies and products to store my data in the “Cloud,” but they all seemed too pricey the higher the storage size went up. So naturally, I thought, “I’m a programmer, aren’t I?” Stop being lazy and make something yourself to push the files into your own personal Azure account without having to pay a middle man. So that’s exactly what I did. I created an Azure account and then I created a Windows service that moves all of my pictures up to my Azure storage account automatically. The service then moves the pictures to my entertainment center hard drive (of course, it displays them in a slide show after a preset time of no activity) and then removes them from my laptop to keep it clean.
Windows Azure
My goal in this two-part article is to first go through creating and setting up an Azure account and then go over the Windows service I created and how it pushes the pictures to my account. In this first article, I hope to help clear the air and explain that Azure isn’t some special club for businesses only, but that anyone can create an account and store data as I did. When it comes to Azure, there are many products you can purchase, and by that I mean that you should really think of this as renting a product, because whenever you stop using a product you, also stop paying for it. You can easily start and stop using a product or service at any time and that is the great part about Azure. I’m going to focus only on the Azure Storage product, but you can go to www.WindowsAzure.com to read about all the options offered by Azure. To better understand Azure storage, simply think of it as a never ending hard drive in the sky. You can simply keep adding and adding to your storage account and it will never run out of space. Also there are multiple backups that are stored as well. When you add items to your storage account, a backup is made and stored elsewhere within the facility. You also have the option to have a third backup made and kept at a completely different facility anywhere else in the world. This gives me the peace of mind that if something ever happened to us, say a fire or flood, my pictures will be safe. In the event of a disaster, I know that the last thing on my mind will be to grab the hard drives or 50+ DVDs with all the pictures on them; I will be focused on getting my family to safety.
Creating an Azure Account
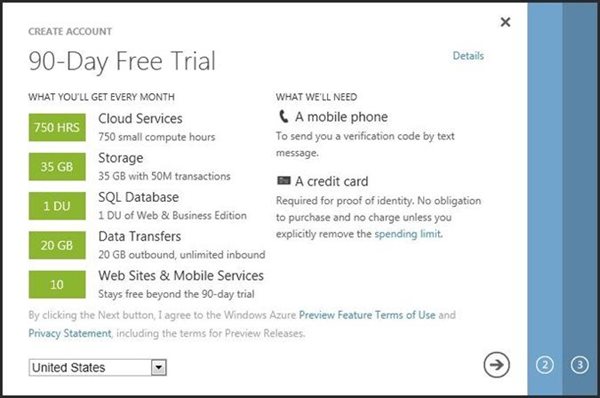
Creating an account within Azure is quite simple and they offer a 90 day free trial. With the free trial you get access to the following:
- 750 small compute hours per month
- 10 web sites
- 10 mobile services
- 1 SQL database
- 100 SQL reporting per month
- 35GB of storage and 50,000,000 transactions
- Unlimited inbound and & 25GB outbound bandwidth
- 20GB outbound with 500,000 transactions with CDN
- 128MB cache
- 1,500 relay hours and 500,000 messages with service bus
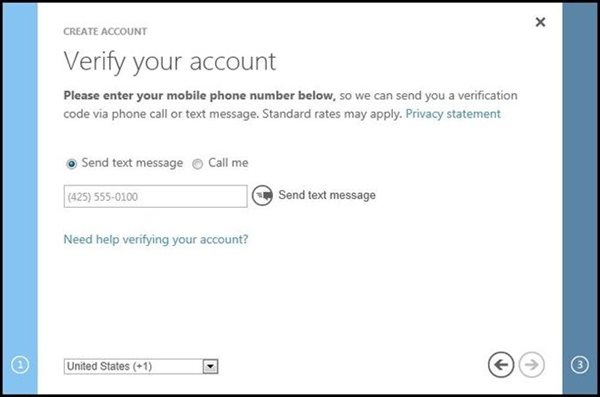
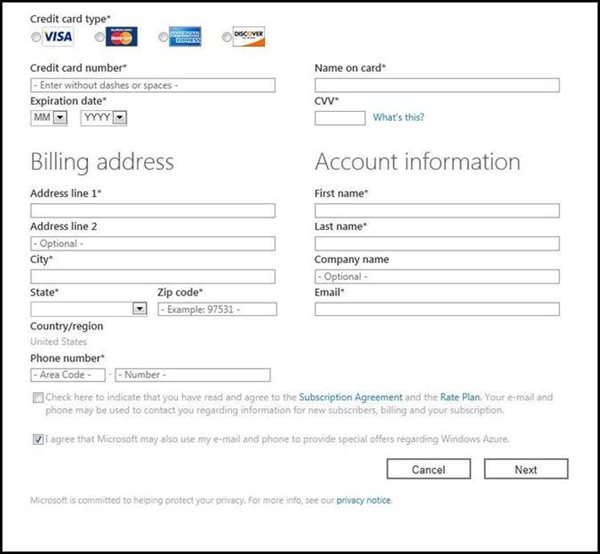
You get all of this free for 90 days, but I am only interested in the storage portion for this article. So to create an account you simply need a Live ID. If you do not have one you can go here to get it. After that, it is a simple two-step process to create the account as shown in the screen shots below. First, enter your cell number for Azure to send you a text message with an access code for the first step of the process. After you have verified this access code you move to the last step where you enter the billing information. After that is complete, you now have an Azure account. Congratulations, you are in the Cloud!
Welcome to the Portal
Once you have created your account you will enter the Portal. Now this isn’t some confusing alter universe where you have to figure out how to get yourself from one point to another. It’s actually quite easy to navigate Azure’s latest updated layout. When I started this process for my account, the portal looked very different, and to be honest, I had to look around to find what I needed to do. With this latest update everything is very clean and easy to find as shown in the screen shot below.
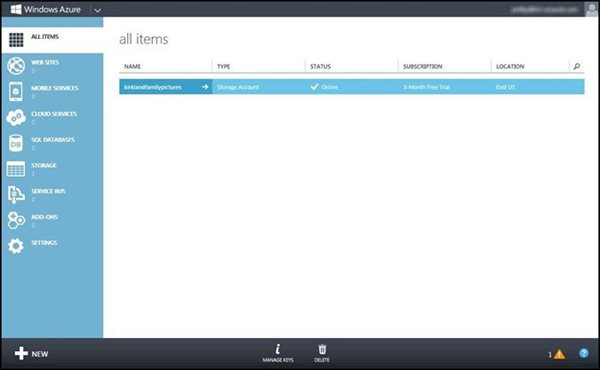
In the left side navigation of the site (above), are all the different services that are available to you through your new Azure account. Again, think of this as a utility such as your electricity or water. You can use a single service or all of them, but you only pay for what you use and only for the quantity of that service that you use. So for my storage account, I only pay for the amount of storage I use. Across the bottom you can create and delete selected items as well as look into any warnings the system may be giving you or look into any help information for the different areas of the account.
How to Create a Storage Account
Creating a storage account is very easy. You simply click on the “New” icon in the lower left of the screen and you are presented with an array of options. To create a storage account select the option as shown in the screen shot below.
Let me point out that you can be quite limited on what your choice of a URL. The last portion of it is set by Azure, but the beginning part you get to choose. As shown in the screen shot below you can see the first account I tried to create for this article was already taken. So, depending on what you try to use as a name, you may run into this as well. There are a couple of guidelines for the naming as well. For example, it must contain all lowercase letters and you have to use a certain range of characters, between 3 and 24. So don’t try to use supercalifragilisticexpialidocious as your name, it’s not going to like that very much.
Another item is the REGION/AFFINITY GROUP option. Basically, this is the datacenter’s location where you want the account to be located. Ideally, this should be close to your geographical location or close to where the majority of your users are located. The reason for that is the possible delay in pulling data from say, Asia, if you live in the U.S.
The last step before actually creating the account is choosing whether or not to incorporate the Geo-Replication option on the account. This option provides a third backup of both your blob and table storage at a secondary region to help prevent any data loss in the event it is lost at your primary datacenter. Now this option does costa little more as shown in the screen shot below. But it’s not extremely expensive, around .03 more per GB per month.
Once you have selected all of your options, simply click on the link to create the account and everything will be set up behind the scenes. Once that is done you will be able to view information about your newly created storage account.
Welcome to your Storage Account Dashboard
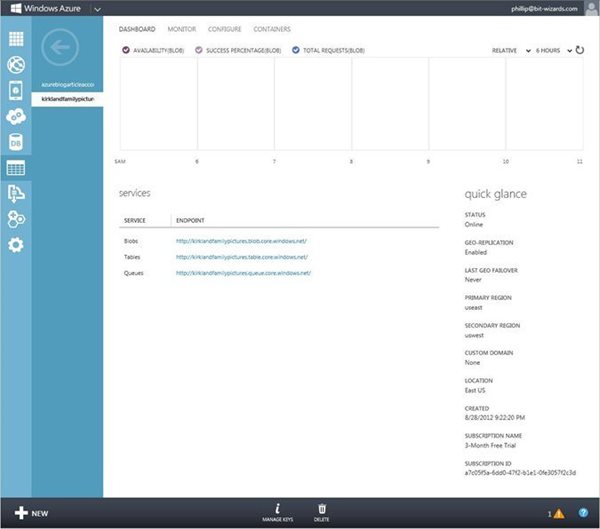
You will begin at your account dashboard, which gives you some quick information at a glance. I’m not going to go into detail on these as they are explained very well on the site by clicking on the help icon in the lower right hand corner of the screen.

The two items I will give some attention to are located at the bottom center of the screen. These are the manage keys and delete options. First please note the delete option is an UNRECOVERABLE event, if you hit this button and click yes on the “are you sure” box… it’s gonna be gone-FOREVER! So use this option with caution and understand it will delete everything without an option to restore.The other option is the manage keys option.
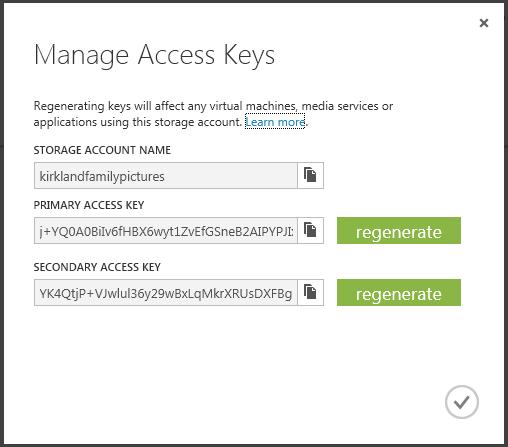
This is the information on how to access the account from the outside. To do this you will need the “Account Name” and one of the “Access Keys” depending on what you want to do.
Now What???
In this article, I shared how to create an Azure account and how to then create a storage account. I hope you can see how easy it is to accomplish all this and how the latest Portal makes moving around in your Azure account easy. But how in the world do you get anything actually stored in the account and how does one access it once it’s there? In part two, I will explain the code needed to push something into the storage account as well as the settings needed to access the data by third party solutions.